There are many instances where Phidgets might get stuck outdoors: weather stations, RC vehicles (quadcopters, underwater vehicles, robots, etc), outdoor installations, and applications we haven’t imagined yet. Some specific examples of Phidgets in the outdoors are a giant drum machine, a sky temperature scanner and precision agricultural monitors.
In this series, we explore how to protect Phidgets from outdoor conditions, like rain and dust. In this post, we look at the basics of enclosures and connectors. In future posts, we’ll expand on this to look at special considerations for certain Phidgets, like humidity sensors and infrared sensors.
The greatest risk of putting Phidgets (and electronics) outside is water, i.e .rain and humidity. Dust is another culprit, posing signifiant problems for electronics (increasing insulation, holding static charge, holding water thus increasing humidity), especially in the long term. Most of the weather-proofing solutions offered will apply to dust and water, with some noted differences.
Temperature is another condition to be aware of. Operating temperatures for each device are given on the product pages. Interface boards (like the SBC3 and 8/8/8) operate within 0˚C and 70˚C, and sensors operate in both wider and narrower ranges. Solutions for maintaining ideal operating temperature will be covered in next week’s post.
Picking the right connector and enclosure

Placement of a temperature/humidity sensor
First, consider the application and your budget. Like most things in life, the better solution is going to be more expensive. Think about the length of time the Phidgets will spend outdoors (a weekend, a few months, or several years). Consider all the possible weather conditions that they could endure during this time. How reliable do your results need to be?
Patrick set up some sensors in and around his home to monitor temperature and humidity. He considered this a bit of a whim and didn’t want to spend too much money on the setup. He placed a Phidgets Temperature/Humidity Sensor under a protrusion of wood (as seen to the right). This setup has been working for five years, but not without consequences. In the graph below, the blue line is the humidity read by the Phidget whereas the yellow line is humidity information that the Nest has pulled off the internet. After five years of being outside, an offset has developed in the Phidgets’ data. As a result, every time it rains (marked by red vertical lines in the graph) the Phidget fails to give humidity data. Calibration can be done in the software to correct the error, but it’s not always practical to do so. The temperature sensor seems to have held out better (no graph displayed).

Humidity read by Phidgets sensors and Nest.
In order to understand weatherproofing, let’s talk about International Protection Marking, or IP codes, which you’ll see a lot when looking into weatherproof connectors and enclosures. These codes rate the degree of protection provided against intrusion, from casings that only protect against large objects such as a human body parts (IP10) to being hermetically sealed from all particles (IP68 and greater). The first number of the rating gives you the solid ingress protection and the second number gives the liquid ingress protection. You probably don’t need a hermetically sealed container for all applications, especially if your sensor needs to be exposed to the air. Here are a few examples of the IP codes (and their respective NEMA ratings, which you could also see) that you might need in various situations:
- IPX3 would be the minimum code you could use, granted you’re in a fairly clear-air environment. (The first digit can be anything) This protects against large body parts as well as water falling as a spray at any angle of up to 60˚. You might need to go down this low if you’re using Phidgets that need to be exposed to the air (i.e temperature and humidity sensors). (There is no equivalent NEMA rating).
- IP53 could be used in a dusty environment for the Phidgets that need to be exposed to air. The liquid protection is the same as above, but it offers more protection from dust as to not interfere with the operation of equipment. A NEMA3 rating will provide slightly more liquid protection.
- IP64 is good for protecting electronics so long as the casing is not going to be submersed in water and won’t be subjected to heavy storms. These items will be dust-tight and protected against splashing water. Usually it’s the connectors and interconnects that have an IP64 rating, whereas most cases and enclosures start at IP65 if you’re looking for something dust-tight. (There is no equivalent NEMA rating.)
- IP65 could sustain a storm (save tornadoes, hurricanes and the like). A NEMA4 or 4X rating is the same thing.
- Once you start building submerssibles, you’ll be looking for IP68 or greater. The manufacturer will specify the depth their product is tested to. This is equivalent to a NEMA6P rating.
There are a few more varieties of IP codes, so it’s worth looking at the Wikipedia entry about them. Not everything will have an IP code or NEMA rating, but some products will say things like “environment resistant” or “weathertight”. All this means is that it hasn’t been tested to the specifications of a specific rating, so choose accordingly. No matter what IP rating you decide you need, there’s still going to be a number of options, here’s a few things you can choose from, and their advantages and disadvantages.
For enclosures:
- Pelican cases are durable, watertight, dust proof, and crush proof (starting with IP codes of IP54). They’re used by the military and in tons of outdoor applications. They’re great if you’ll be accessing the contents on a regular basis. While they are not temperature regulated, we’ve found that with the foam and the heat generated by a running SBC, that’s enough to keep the temperature above the necessary 0˚C, even when operating in a nearly -30˚C environment (tested over five months). Pelican makes a range of sizes, and prices start around $35 for new, but you can find used cases for less online. Phidgets put a weather station out in Kananaskis and chose a Pelican 1200 case for it since we’d be switching USBs on a weekly basis and needed some insulation.
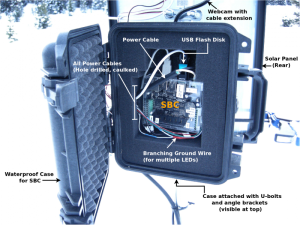
A Pelican case installed in a Kananaskis weather station to house an SBC
- Various manufacturers found on Digi-Key make plastic, polycarbonate and/or ABS boxes with IP54 ratings and above. These boxes sport features like PCB support, hinged doors and mounting ability. They come in a variety of sizes as well, but for 99% of them, you will have to figure out your own insulation. Some boxes provide semi-permanent enclosure (no easy access to the contents once it’s installed). A practical sized box will start around $3.25, but for a decent enclosure, you’re probably looking for something that starts at $25. There’s a lot to choose from, although you’ll spend some time browsing to find what you need.
It’s wise to put a desiccant in the case to absorb any moisture. You’ll need 5 grams of desiccant per gallon of space. You will not need to replace the desiccant if you aren’t re-opening your container. If you do re-open your container, you’ll need to replace the desiccant when it has absorbed all the moisture it can (which will depend on your air quality and frequency of re-openings). Digi-key sells desiccants, but if you’re not looking for 150 packets, then you can find something small and cheap on Ebay.

Two Phidgets sensor cables running through a USB 2.0 cable with cable grip
For cabling:
Cabling itself does not pose a problem, but it’s important to realize that because we need to run cabling into and out of the enclosures, that cabling “pass-through” is going to create a place for dust and water to enter the enclosure. If everything were wireless, we wouldn’t need to worry about connections and putting holes in boxes, but the fact is we do.
Even when using an SBC, you’ll have to connect an external power supply, that will likely be located outside of the enclosure.
In general, we would recommend only passing sensor cables through connectors (unless you’re using USB couplings, mentioned later). Trying different strategies out for ourselves, we found the USB cables difficult to work with. For one, USB cables have five connections, as opposed to the three of a sensor cable, which means more soldering or crimping work, and more places for problems to arise. Because of how small most connectors are, having less wires is definitely an advantage. It’s also difficult to attach the shielding of a USB onto the connectors, which can compromise the performance of the cable and risk crashing the Phidgets. Not to mention, USB cables have a maximum length of 5 meters (3 meters for slower speed data transfer), which means that you’re going to need a computer fairly close to the enclosure. Luckily, a lot of sensors work over long sensor cables, allowing you to put the outdoor installation farther away from the computer running your program than if you use USB cables.
Phidgets sensor cables can run outdoors, but the problem they pose is being oddly shaped, so as to not fit tightly in connectors. A relatively simple fix is to run the sensor cable through a USB cable (get instructions on the Phidgets blog), which is round and will seal off nicely when run through a hole or cable grip. When doing this, you don’t have to worry about the shielding in the USB cable.
For connectors:
- USB Circular Couplings range in price from $15 to a whopping $178. Even the ones on the lower end of the price spectrum can offer IP67 ratings. These are especially easy to use. Just install the the female connector into your weatherproof case and plug the USB cable from the Phidget in.
- Cable grips and cable glands range in price from $0.35 (for polyamide and plastic) to $130 (for brass and metal). You can also get grips made of Nylon and various other materials. Even the dollar-priced grips can have an IP68 rating so this is a really affordable way to protect the cable connections. Unlike circular connectors, you don’t have to deal with delicate soldering. The downside is that you will need to cut the cable and re-solder it in order to get the grip around it. This is not always going to be ideal.
- Circular connectors (also called MIL spec connectors) cost anywhere from $15 to $50 for each side of the connection. Look for ones with crimp terminations. The circular connectors are particularly useful if you plan on taking them down and setting them up repeatedly, if you are using a semi-permanently sealed container and/or if you need to change the connections. They’re also quite handy if you’re not using standard cables. The downsides are that they are difficult to install, pricier and prone to wear if you plan on plugging and unplugging frequently.
- 100% silicone caulk offers a really cheap and readily available solution. If applied properly, it will seal out moisture and hold up in direct sunlight and temperature extremes for a time. However, after a couple of years it will start to peel and lose its bond. If you want to replace any cables, you’ll have to deal with removing the seal. Also, the weatherproofed-ness for the seal is heavily dependent on the quality of your application.
Before you settle on a solution, you’ll need to understand your project, decide on a budget and select parts that are going to be effective. Pelican cases are really easy to set up, but may not provide the protection you need. Silicone caulk is cheap, but difficult to apply well enough to get the best protection. There are advantages and disadvantages to all of the solutions offered here, but hopefully you can now start choosing what you need.
The next thing to look at will be insulating Phidgets to keep them within the recommended operating temperatures. We’ll look at a few different material options for different situations.
I'm an everyday walker, a passionate learner, and en educator creating experiences that grow eco and digital literacy. I'm living with stage IV colorectal cancer and type 1 diabetes, hoping to eek out as much life as possible before the cruel world takes me.

Try the Sockit box from Lee Valley
http://www.leevalley.com/US/wood/page.aspx?p=70211&cat=1,43326
That’s a great suggestion! I never thought of Lee Valley. Thanks Frank.